Dirty Scooters - Lambretta Li 150 series 2 restore and 64 GL malossi 221

this blog is a record of my scooter projects. The Dirty Rocket is finished for now, and I am about to begin restoring a '58 Lambretta Li150 series 2. The Dirty rocket started out as an attempt to build my ideal scooter from a rusted bare heap for as little money as possible. (The frame is a '57 VNA) now a 64 GL frame. TO FOLLOW THIS CHRONOLOGICALLY, START FROM THE BOTTOM OF THE PAGE... AND Please leave comments/ tips/ warnings!!!

Tuesday, August 22, 2006

Much to-do about nothing

the list of things to do during the motor changeover...
  • change clauss mounts back to stock
  • splitcases
  • change flyside bearing and seal
  • tap a hole for vacuum fuel pump
  • check clutch bearing
  • have crank trued

pump up the jam - but not the fuel

I have been asking around whether the vacuum pulse in the inlet manifold of a sidedraught carb (rotary induction) will suffice to run a small fuel pump...... no-one gave me a straigh answer so I thought I'd give it a go.

Update - I have just tapped a 1/4" line from the base of my inlet manifold (rotary pwk clone) and attached a fuel pump for testing.
I held one end in a bottle of fuel and the other over a bowl. The rise from the level on the bottle to the outlet was about 6" and I kept he hose lengths to a minimum. vacuum line length 8".
Nothing happened until I raised the bottle and removed air from the lines then....
At about 1/4 throttle it pumped fuel. Easily enough for 1/4 throttle riding.
AT 5000 rpm it was still pumping.
It slowed down at 6-7000
At flat stick it stopped pumping (8-9000rpm)

Currently I would call the project a failure, but I will do some more testing outside (I feel quite sick right now) and with the pump hooked up to the tank.

I am giving the motor a once over with the cases open when I put in in the project GL later this year, so I will tap the case then (remind me someone).

THe good thing is I achieved soemthing with the jetting.
Basically I oiled the air filted, restricting air and making it too rich. I then leaned out everything except the main jet.
132 main
JJH needle second position
38 idle
screw 2 turns out

I also rode aroud with a spare fuel bottle waiting to see at what stage the carb began starving for fuel. I was very please with getting 7 litres used up with no running out (I chickened out in the end) leaving only half a litre in the tank. Gold.

By the way I only got 100km from those 7 litres, but things might improve with a leaner mixture.

Wednesday, August 16, 2006

Fender Off With a Grinder


Well I lined up the fender as best as I could.
I had to sand the aluminium off the fork, bash out the fender a bit and drill new holes. All in all I think it looks straight.
I will compare my pics to some 'real' ones today and see if I have gone completely wrong.

Tuesday, August 15, 2006

Jetting all day, Jetting all night


After spending a couple of hours fiddling with the jets in the OKO 28mm carb, I cleaned up and wandered down to the forum to see the band 'Jet'.
My friend Steve plays keyboard in all of their shows (and on the record) , so needless to say there was some boozing to do. So busy was i at Jet that I forgot what jets I had put in earlier in the evening.
Fortunately when searching the internationalscooterbbs for jetting info, I found a post i had made before going out indicating the jetting changes I had made.
132 main
42 pilot
air screw 2.25 out
GKB needle (randall at Scootrs says it is an OEM needle, but I will have to research exactly what that means)


NOW! My worry is fuel starvation and I am deciding If How and When to install a vacuum fuel pump. These work by tapping into the pulsating crankcase pressure, normally involving drilling into the engine cases. Because of metal filings, this should always be done with the engine in bits. (a drag).
The online scooter community seems to be lacking in info as to whether the vacuum line can be taken from the inlet manifold instead of the cases (on a rotary valve motor). A go-kart guy gave me a definite NO, but some online say it is possible. I know it is cool in the reedblock on a reedvalve setup, so maybe people are getting them confused.
I will definitely tap the manifold and do some testing with fuel cans at different rev ranges. The pump is on order.


~ look at the brass fuel line nipple sticking up to the left of the pink hose. The base of that is at the same height relative to the fuel tank as a stock carb. If this can be swapped for an l-shaped fitting, the hose wouldn't have to rise up and down onto the nipple, creating the same fuel flow as for a stock setup. The pump setup allows for long range tanks, auxiliiary tanks etc, but at least if the flow can use all the main tank, I am not in danger of fuel starvation at 1/3 tank under load which could lead to leaning off and seizing.

Saturday, August 12, 2006

Making a meal of the High Carb- Hide-Rate

THIS POST IS ONE I WILL UPDATE AS MY JETTING CHANGES.
It starts when the carb is installed on the px200 (LML T5) and is currently on the GL PX 221 with Malossi reed block............ go to bottom for current setup


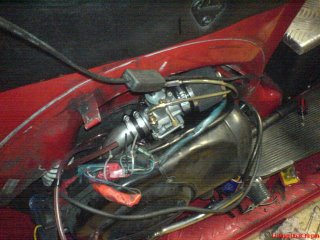
Ok, now I have installed the PWK Knockoff carby, and I am trying to jet it correctly.
The throttle cable went in easily enough. I already had a japanese style throttle cable anyhow (due to the shop not having a vespa one when mine broke). The choke adaptor was a bit dodgy but I got it done anyhoo.
It's the jetting that will be hard.
I started with the following:
130 main
stock (dunno) pilot jet
jjh needle in middle clip
Screw 2 out

At first I thought it ws all a bit lean as it was flat at 1/2 to 3/4 throttle.
I changed over to a 5th clip(richer) and a 136 main.
On the way home from doing that I felt that it was too rich -too lean-too rich
Tomorrow is plug chop day. I will be tearing up the freeway- a bit at a time.
First stop is needle back to middle notch, 132 main, 2 out.

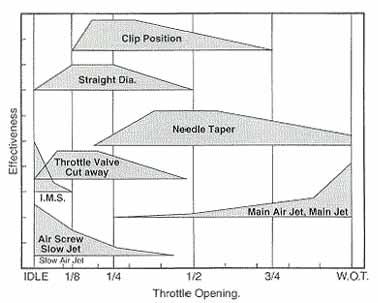
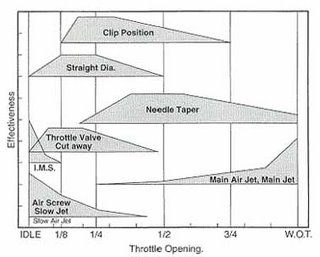
They sent me 15 different main jets, two idle jets and two needles. I think the main jet will be the easiest to sort out... but... I have been studying up on the balance between all the needle elements and other jets, and have some info. Here's a collection of stuff taken from various locations...

It has been a while, but without banging on too much, I have experimented with a fair bit of jetting. After touring Tasmania 2-up I rebuilt the gearbox and since found the jetting to be boggy. I cleaned out the air-filte (foam pod) and changed the jetting from.
LJH 2nd clip

to.

JJK (leaner taper and leaner diameter) middle clip.

It runs great and for the first time has no bog down at 1/4 throttle.
The national rally (over 1000 km's ) is this weekend so I will keep a careful eye on the leanness (CHT guage) and be prepared to pop a richer taper or main jet in before leaving.

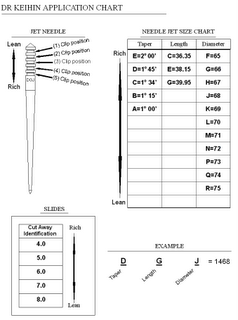
I have the following needles in order from rich to lean....
JJF (richer diameter 1/4) middle taper
LJH (middle diameter 1/4) rich taper1/4-3/4
JJH (middle diameter 1/4) middle taper
GJH (middle diameter1/4) Lean taper
JJK (lean diameter 1/4) middle taper - middle clip position - test1a
-2nd clip (leaner) test 2a(JL pipe)

test 1a - 15 km later the thing has great pickup through the rev range. A bit vibrationny at around 5500-75oo rpm. Still to hwy test to see what the main does. (haven't changed it but something seems to have richened everything... maybe the old flyside seal or the exhaust stub were leaking. In fact I know they were).

Now, things have changed again...
I have re-installed the infamous SIP performance (jl I believe) pipe.
It pretty much goes like a rocket without any carb changes which is good.
As these push the useable power higher in the rev range, I will have to now focus on getting the carb dialled in perfectly in the 0-1/3 throttle range. This is because the engine simply wants to get past the low revs as quickly as possible when taking off, and any delay can cause frustration.

Anyway....
TEST 2a - I have dropped the needle (raised the clip) to try and sharpen up the response in the 1/4 throttle area. The bogging/ loss of power in this position could well be due to a too lean clip position, so I am prepared to humbly go the other way later today .


Thursday, August 10, 2006

en-guard..... or... guard-on


My GS front guard arrived today. Hand made in Vietnam, it isn't too bad and should come up ok with some sanding and a skim coat. The big challenge will be shaping the PK fork aedn beating the fender to make it sit right. The PK fork was designed to fit a big squared off fender like a PX.

Partly finished event

Here's pics of the cowl repair...


A loop hole in the Santa Clause

It was an August Christmas in Collingwood today.
Today I took reciept of
  • Keihin PWK copy carb
  • air filter pod
  • Repro GS front guard
  • rear shock mount
  • little bits and pieces
Also the panelbeater I left my old VNA cowls at wouldn't budge from $500 just to beat them straight and add some filler. That is without fixing the broken fins. I went and got them back, welded some bits of steel where the fins were, and welded up a couple of cracks.
They will do for now. I'd miss the added versatility of 'less than precious' cowls. Not just handy for pushing over to change the tyre....

Wednesday, August 09, 2006

forking marvelous


My new hero NORM has come up trumps with the PK fork, and finally the project feels like it is moving forward.
Norm has an engineering plant called Saville Engineering, is a Harley Davidson enthusiast and took on the job of making the changes to the pk fork. He went above and beyond to sort out the issues I had, and understood my financial woes.
Putting together the front end brought up a few more minor jobs...
  • get lever bolts
  • find alternative front brake cable
  • find alternative to speedo cable
  • investigate seat latch
  • change steering lock
  • start thinking about wiring
  • alter light switches
  • battery cage

Tuesday, August 08, 2006

gettin' it together

It may not be much, but I have actually attached something to teh GL frame.
I have screwed on the centre mat (scootrs - Vietnam). Sounds simple but was quite tricky. The screws supplied were absolute trash and stripped almost immediately. I ended up re-using the 43 year old rusty screws, which held together just fine. Stretching the mat while trying to line up the metal rail and then screwing in a screw was quite difficult .
So there you go, I have started assembly. Yay.


By the way, I have been advised to NOT use the VNA front guard with a ten inch wheel, as it is too small and may lock up under full suspension. I have ordered a GS160 front fender from scootrs in Vietnam. even they admit it is not perfect, but should keep with the rounded look I am going for and still look better than the beat up vna one .
this is a picture of the fron fender from the scootrs website

Wednesday, August 02, 2006

Let's workshop this ...


here's the workshop.
This space has been an underground bar, a poker club, an art studio, storage, my home, and now it has become my scooter workshop.

letspray


today the VNA side cowls went to the panel shop for a quote.
I don't know if it got through that I wanted the holes bogged, and a cheap job straigtening up the dings.
On the way back I got the frame (original colour) colour matched, so tonight i primed the headset and handlebars, as well as touching up parts of the frame that were in danger of rusting up. I want to keep the original patina which is not in too bad condition.

FREE hit counter and Internet traffic statistics from freestats.com